
Kedarkantha Trek Route & Map | Complete Trail Guide
The Kedarkantha trek route starts at Sankri and follows these steps: Dehradun → Sankri → Juda Ka Talab → Base Camp → Summit → Hargaon / Juda ka Talab → Sankri → Dehradun. It is explained through a clear map with height, distance, and day-wise trail details.

If you are planning the Kedarkantha trek, understanding the route and trail layout matters more than anything else. This is not a technical trek, but weather, forest sections, and summit day timing can catch people off guard if they rely only on surface-level maps.
This guide on Kedarkantha trek route map clearly outlines step by step journey, explains how the trail flows on the ground, and helps you mentally visualize the journey even before you set foot in Sankri.
What is the Kedarkantha trek
The Kedarkantha trek is one of those rare Himalayan journeys that manages to feel exciting without being overwhelming. Located in Uttarkashi district of Uttarakhand, it is often counted among the most popular winter treks in India, and for good reason. The trail is friendly enough for beginners, yet the thrilling summit climb gives you a real sense of achievement, especially when you finally stand on top after the last steep stretch.
One of the strongest highlights of Kedarkantha is the changing landscape. The trail passes through thick forests dominated by pine trees, with sections of deodar, oak, and rhododendron appearing as you gain elevation. These forests are not just scenic; they are deeply connected to local life. Deodar wood has long been used in temple construction, while oak and rhododendron serve practical purposes like tools and fodder, still visible in nearby villages like Sankri and Kotgaon.
As the forest thins, the route opens into snowy landscapes, frozen streams, and the serene Juda Ka Talab, often locked in ice during winter. The final push to the summit is short but demanding, and that contrast is what defines Kedarkantha. It gently prepares you, then asks you to dig a little deeper, and rewards you with one of the most satisfying summit experiences in Uttarakhand.
Where Does the Kedarkantha Trek Start?
The Kedarkantha trek route starts at Sankri, a small Himalayan hamlet within Govind Wildlife Sanctuary & National Park in Uttarkashi district of Uttarakhand.
Sankri sits at around 6,400 ft and works as the base camp for multiple treks like Har Ki Dun, Bali Pass, and Phulara Ridge. For Kedarkantha, Sankri is where paperwork, gear checks, and first acclimatization begin.
Most trekkers reach Sankri via:
- Dehradun → Mussoorie → Naugaon → Purola → Mori → Sankri (by road)
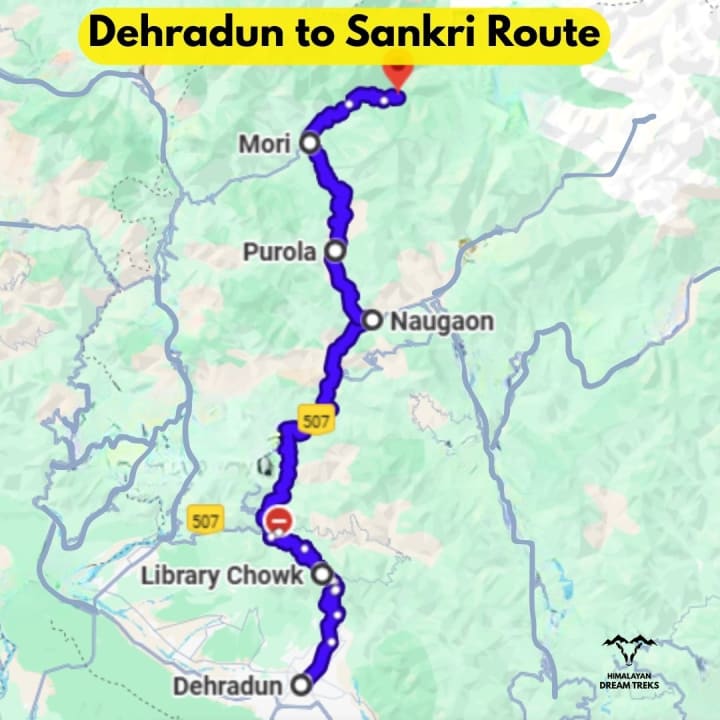
Once you arrive, the trail ahead is completely on foot.
Kedarkantha Trek Route Overview (Quick Snapshot)
Before going into details, here’s how the classic Kedarkantha route looks:
- Day 1: Dehradun → Sankri
- Day 2: Sankri → Juda Ka Talab
- Day 3: Juda Ka Talab → Kedarkantha Base Camp
- Day 4: Base Camp → Kedarkantha Summit → Hargaon / Sankri
- Day 5: Return to Dehradun
This route is popular because it offers steady altitude gain and excellent acclimatization.
Day 1: Dehradun to Sankri (Drive Day)
This is a long but scenic drive of around 200 km, usually taking 8–10 hours.
The road follows the Yamuna valley for most of the way. You pass Mussoorie diversions, Purola town, Mori, and finally reach Sankri as the valley narrows and pine forests begin to dominate.
By the time you reach Sankri, the mountains already feel close and real.
Day 2: Sankri to Juda Ka Talab
- Altitude: 6,400 ft → ~9,100 ft
- Distance: ~4 km
- Trek Time: 4–5 hours
This is where the trek actually begins.
The trail starts right from the outskirts of Sankri village and immediately enters dense pine and oak forests. In winter, this section often has fresh snow, making it one of the prettiest parts of the trek.
You will notice:
- Wooden bridges over small streams
- Gradual inclines, never too steep
- Occasional clearings with valley views
Juda Ka Talab is a frozen lake in winter and a calm water body in other seasons. Campsites here are surrounded by forest, making nights quiet and cold.
Key trail character:
- Forest-heavy
- Gradual ascent
- Ideal acclimatization day
Day 3: Juda Ka Talab to Kedarkantha Base Camp
- Altitude: ~9,100 ft → ~11,250 ft
- Distance: ~3 km
- Trek Time: 3–4 hours
This day feels shorter but more open.
The forest starts thinning, and you begin to see snow-covered clearings and mountain ridgelines. The climb is steady, and by afternoon you reach Kedarkantha Base Camp, which sits just below the summit cone.
From the campsite, the summit looks deceptively close. Many first-timers underestimate summit day after seeing it from here.
You will clearly notice:
- Wind picking up
- Temperature drop after sunset
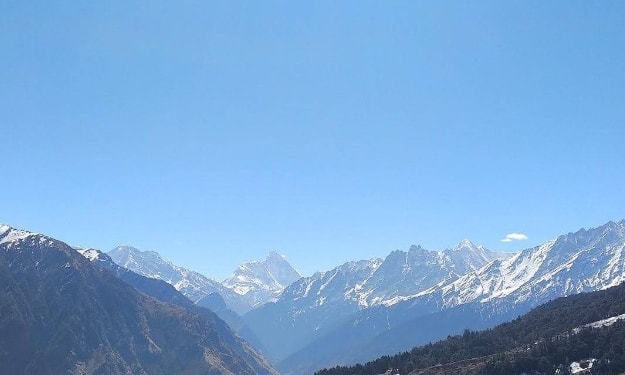
- Clear views of Swargarohini and Bandarpoonch ranges
Day 4: Base Camp to Kedarkantha Summit (and Descent)
- Summit Push
- Altitude: ~11,250 ft → 12,500 ft
- Summit Time: Early morning (usually 3–4 AM start)
This is the most demanding section of the entire route.
The trail is steep, narrow, and zigzags through snow in winter. Trekkers move slowly in a single line with headlamps cutting through the dark.
At the top sits a small temple, prayer flags, and a 360-degree view that includes:
- Swargarohini peaks
- Black Peak (Kalanag)
- Bandarpoonch
- Yamunotri range
After spending some time at the summit, the descent begins quickly to avoid weather changes.
Descent Route (Important Detail)
Most teams do not return the same way.
Instead, the trail descends towards:
- Hargaon campsite, and then
- Back to Sankri
This makes Kedarkantha a loop-style trek, not an out-and-back route.
Kedarkantha Trek Route Map (How to Read It Practically)
The Kedarkantha trek route map follows these steps: Dehradun → Sankri → Juda Ka Talab → Base Camp → Summit → Hargaon / Juda ka Talab → Sankri → Dehradun.
When you look at a Kedarkantha trek map, keep these points in mind:
- The trek forms a rough loop, not a straight line
- Forest sections dominate the lower half
- Open snow slopes appear only near the summit
- There are no exposed cliff walks or technical sections
Navigation reality:
The trail is well-marked during the trekking season. However, in heavy snowfall, the route is often navigated by guides using experience rather than visible trail markers.
Alternative Routes (Less Common)
While the Sankri route is the standard, a few variations exist:
- Entry from Kotgaon (used rarely)
- Exit variations depending on snow conditions
These are mostly used by experienced teams or locals and are not recommended for first-time trekkers.
Why This Route Is Perfect for Beginners
Kedarkantha’s route works so well because:
- Daily altitude gain is controlled
- Campsites are naturally placed
- Forest cover reduces wind exposure
- Summit day is challenging but short
This balance is why Kedarkantha is often called a perfect first Himalayan summit trek.
Final Thoughts
Understanding the Kedarkantha trek route and map gives you confidence even before you start walking. Once on the trail, things feel intuitive. Forests guide you, campsites arrive at the right time, and the summit stands patiently above it all.
If you respect the route, start early, and pace yourself, Kedarkantha rewards you generously.
About the Creator
Keep reading
More stories from Mountains Curve and writers in Wander and other communities.
Auli Travel Guide: Skiing, Trekking, Ropeway and Best Places to Visit Around
Tucked away in the Chamoli district of Uttarakhand, Auli is a dreamy destination nestled in the Garhwal Himalayas. Known for its snow-laden slopes, panoramic mountain views, and adventure sports, Auli is a paradise for nature lovers and thrill-seekers alike. Whether you're visiting in winter for skiing or in summer for lush meadows and treks, Auli has something magical for every traveler.
By Mountains Curve6 months ago in Wander
Seattle Nightlife Report: Pony
Mid-winter Friday night. Early but already so dark. The days are getting longer but 6 PM is still pitch black. “Firepit!” You declare things after just a few seconds of solemn thought – not a request or suggestion, not a demand. Last week you walked around saying, “Hot tub?” to anyone who would listen. Or one afternoon you pointed at two men holding hands as they crossed 12th Avenue, looked me in the eyes and said, “Boyfriends.”
By Joe Nasta | Seattle foodie poet12 days ago in Wander
Top Luxury Resorts with Poolside Bars in the Maldives
The Maldives has an almost effortless way of redefining luxury. It isn’t about excess or showy glamour; instead, it’s about space, silence, natural beauty, and experiences that unfold slowly. Among the many indulgences the islands offer, one stands out as a quiet favourite for seasoned travellers: the poolside bar.
By Maldives Moments6 days ago in Wander
Cabin Fever Because of Snow, Sleet, and Freezing Rain That Turned to Icy Roads
What Is Cabin Fever? The short answer is that cabin fever is restlessness from being in a confined area. Cabin fever is the distressing irritability or restlessness experienced when a person or group is stuck at an isolated location or in confined quarters for an extended time. Research shows that prolonged cold, gray skies, and being stuck indoors can trigger mood shifts similar to “winter blues.”
By Margaret Minnicks3 days ago in Humans


Comments
There are no comments for this story
Be the first to respond and start the conversation.